Showing posts with label Papo. Show all posts

Monday, 23 May 2022

The Mini Megaloceros

Something very different for a change! Papo's magnificent Megaloceros sculpt becomes my first ever prehistoric repaint, the first deer model to enter my collection, and my first custom to come with his own illustration!

When I paint my horses, I'm generally working from a reference photo or two for the colour or pattern I'm trying to recreate, or just making up something I know is realistic, from memory - because, well, I've seen horses before!
With my other wildlife repaints - the Fox, the Cormorant, and the Hare - I've used nice big clear photos from Google to make sure I'm getting the markings and colours in as realistically as possible, in terms of placement, detailing, and paint mixing.
I've painted an extinct animal before - the Quagga - but the Megaloceros (also known as Irish Elk) went extinct a little less than 8000 years ago, rather than lasting into the modern era and leaving photographs and taxidermy specimens in museums.

All the same, I knew I'd be much happier and more confident working from some kind of reference, rather than trying to design my paintwork actually on the model with wet paint and trial-and-error layers to make design changes as I went along.
And I really didn't want to piggyback off someone else's efforts, recreating somebody else's reconstruction or illustrative art from books or CGI tv episodes; even though that can be an honest tribute and perfectly valid resource, I want this to be my interpretation, not borrowing someone else's creativity.

Luckily, we do have one fantastic source for information on how prehistoric wildlife looked, in cave art which has survived all down the centuries from the people who saw the animals first hand.

Here's the first example. All we can really gain from this one is a general impression of darker on the neck and shoulder, and along the back - but it's possible the painting is either unfinished, or cropped to focus on the head and antlers, and the 'paler' part is just not there!

Here is the next example, a much more complete animal. Again, we see darker along the back, the neck and throat, and the shoulder added as shading within the outline. There's also a very distinct diagonal stripe from the hump at the shoulders down to where the hind leg meets the underside of the belly. This is a recurring detail in cave paintings from different locations, so can't just be one artist's weird quirk or error in constructing the body shape - more than one person painted a stripe, it's reasonable to take that as proof it was there.

Here is another example, two animals overlapping but if you just follow one set of lines at a time, you see the same thing - dark hump, dark shoulder (as a stripe this time), diagonal body stripe . There's also a dark throat, though this time the neck itself is paler.

Of course, all these paintings are simplified, and stylised, and all are more outlines with markings, rather than full colour like some of the horse and cattle paintings, where we can see shades of brown entirely filling in the body shapes.
But the general idea I get from them, and other examples, is a paler body colour with a darker top line, dark neck possibly with throat and chest 'collars' rather than a single wide band, and there must be a marking along the side.

When I was reading up on the Megaloceros, I learnt they were a relative of the Fallow Deer rather than the Red Deer, which makes perfect sense when you consider the antler shape in all the preserved remains.
This is my only real-life connection to the species, by the way - I have seen a head of 'Irish Elk' antlers on the wall at a castle here in the UK, found in a bog and mounted as an impressive curiosity in the 19th century gentleman-naturalist boom era.

So I decided it was quite important to avoid making the model look like an oversized (and over-antlered!) Red Deer when designing my paintjob, and the best way to do this would be to not even look at Reds in my preparation time, and take my colour palette from a darkish Fallow stag - this exact photo, to be precise.

The markings I've adapted, of course, by adding in the diagonal band along the side of the body, and altering the placing of the white and dark from the throat down toward the chest. I just worked where it seems to naturally blend and mix with the real deer's colour, while keeping each marking we see in the cave art.
And I've taken the spots away entirely - because I'm sure if the ancient deer had had such a noticeable feature, the cave artists would've put them in. They painted some spotted horses, and DNA analysis on horse bones and teeth from the era has proven leopard spotting genes were present in the prehistoric horse population at that time. Other animals in the same caves, like Red Deer and Przewalski-looking dun horses, are painted in accurate colours we easily recognise today. So I think the painters can be trusted on this, and if there were spots, they'd have put spots.

Enough rambling, here's the actual picture bit of the post (well done if you read all that instead of just scrolling this far, hahah). I've never drawn a deer before, so I worked from the Papo model instead of figuring out anatomy and inventing a different pose from scratch, and after all, it's for him rather than a stand-alone artwork in it's own right.

Here he is blank and waiting for his colour.


My intended design - though I'm not sure how easy it will be to match the actual paintwork to what I've done with him here! But I don't mind if it's a little different, and I'm not going to drive myself crazy trying to replicate these precise shades and blending exactly, as after all it's all guesswork and based on tweaking a modern animal, cos none of us have seen the real thing, except those cave artists who left us such helpful clues!


And finally, here he is with a background, just cos he makes a pretty portrait (recycled from the folder of my older art - that one originally had a horse in front of most of it so it's a bit rough and unfinished, but was the only background I had which didn't include a hedge, gate, stone wall, brick-walled stable yard, or ploughed field!)

Now, on to the model...


Here's the before picture, so you can see what colour he started out. 
He's not the same scale as Papo's horse models, or any of the other horse ranges you'd be familiar with, so I can't really say 'oh, he's a big as a so-and-so' to give you a better mental image - I'd say he's standing around halfway between Breyer Stablemates and Schleich/CollectA large breeds in size, but not scale - remember, the Megaloceros was much bigger than a horse in real life, more like a moose (although not many of us in the UK have ever seen a moose either!)

And now some in-progress stages. Apologies they're not very bright or clear photos, I started too late in the day to use real sunlight, and I couldn't figure out how to switch on the flash on my camera!


Layer one, adding some more milk-chocolate brown to soften down the dark colour, and some tan shading where the lighter parts start.


More of the paler brown, mostly to the lower half of the body, plus the initial layer of cream to the legs under the belly, and top of the head. At this point, I'm applying the paint straight from the pots so it's thick and sticky, smudged with a big brush to spread it as far as possible and rub into all the little hair details of the sculpt.


Starting the texturing of the body colour, and beginning the detailing of the face, with light round the eyes and nose. At this stage, I'm using some dry-brushing to catch the sculpted texture on the mould, and at other times I lick the brush then touch it to the paint, so it's diluted and thinner. As I've said before, only do this if you're sure your paint isn't poisonous; if you're not certain it's safe and/or you're less lazy than me, you could set up a soaked sponge in a bowl to get the same damped effect, without saturating your brush too much like dipping in a glass of water would.


And now upping the contrast a bit, with added white for the chest & belly, and darker colour for the back of the neck, shoulder hump, and side/chest stripe markings. Again, there's some dry-brushing and some fine brushstrokes.
I tried to make the markings quite blended in and not have a 'painted on afterwards' look, I know some animals do have very sharply defined stripes (like the dark band markings on Thompson's gazelles) but cos the sculpt has quite shaggy fur I didn't think there could be quite such a crisp dividing line between black and beige, more of a soft overlap would happen.


More definition and detail for the markings, especially filling in the face with eyes and nose and a hint of pink inside the ears, then the feet (I always do them toward the end, otherwise handling the model on my lap to continue the body colour rubs the paint off the edges and toe-tips), and finally the antlers. They were done with a base layer of beige, then blacks and browns dabbed on with a very fat brush, to try to get a different texture to the body fur. The very tips are given white highlights - where deer rub their antlers the bone polishes very clean, white and smooth at the points.


Finished!
The next day, he went outside for a much better photoshoot in the sunshine...


I'm so pleased with how he turned out, I really like him and will enjoy having him in my collection, even if he is my only prehistoric mammal and has no friends to stand with yet.


The shade makes his dark markings stand out more, but he looks prettier in the sun, so most of the other photos I've chosen do favour bright light.


There's a couple of areas which don't fully match my drawn design, but as that's also just an interpretation and not an authentic image of the real animal like when we can work from photographs of modern species, I'm not too annoyed with myself for going accidentally off-plan!


I may have gone a bit overboard on the number of pics, but this sculpt looks great from so many angles!


Do not sneak up on the Megaloceros from behind.


Those antlers are just amazing; they'd look impossibly impractical and unrealistic, if we didn't have so many examples as proof in real life, from peat bogs and the like!


You know that feeling when a Red deer stag stares you down, and you don't know whether to feel intimidated cos he's massive and potentially dangerous, or safe cos you're such a small insignificant creature in comparison that he'd not even waste the energy to come at you? This one has the same look about him!


SUCH a handsome head! I'm really pleased with his face, but the sculpt has a lot of detail there anyway, so it's giving me a lot to work with. I took his face markings from another Fallow deer reference; the little pale rings around the eye which help exaggerate it, and the way the profile of the nose shades to dark, but with white just around the nose and mouth.


I took a couple of different headshots without the miniature background, his outline contrasting nicely against my nice dark hedge.


A close-up portrait, and more of that mildly-threatening side-eye going on!


And one more full photo to finish on. A very different project for me, but a lot of fun. 
I'm considering doing a cave-painting inspired prehistoric horse next, so he's got some contemporary company, though there's no specific sculpt for that era so I'd be picking from modern horse breeds to find the most primitive look. Perhaps the CollectA Mongolian for that upright mane and flat back, or the Exmoor or Konik which are so often described as the closest to our European horses' ancestors.

For now, I'm just happy with my little giant deer!

Saturday, 9 October 2021

Donkey Days

Why yes, I do need more Papo donkeys!


I'd bought the current grey Provence donkey pair earlier this year, so when this very sweet older pair come up on Ebay I just couldn't resist adding them to my herd as well.


A really lovely sculpt, with a different shape to the current pair - this one has a larger head and shorter legs. She looks a lot like the donkeys I used to work with, though they were Irish rather than French (they came over on a horse transport by ferry, my boss had ordered just one but he'd bonded so much with his travelling companion she bought both!)


I think I prefer this sculpt to their newer one, it may be a very static and uninspiring pose but she just looks so typically donkey, I love it. The paintwork is quite basic, but effective enough, and curiously they look more grey than brown in the shade, and more brown than grey when the sun's out bright!


I just love that calm, chilled-out look on her face - not a hint of the stubborn and/or depressed donkey stereotypes in this one!


Here's the matching foal, in a slightly more energetic pose!


Pestering mum to play! I always think it's nice when the matching adult and offspring are given complimentary poses, so they each look fine alone but work well as a pair, and can be posed to look as if they're interacting. I've called them Paddington and Bear, they seemed to need matching names.

Having expanded my donkey collection by a substantial amount already this year, I also decided it was about time I had Papo's Poitou donkey in my herd!


He's got lovely fur texture, a little bit smoother than the Schleich version, but sculpted nice and deep to properly show the long hair and the way it curls.


A lovely calm face - I've liked all the Papo donks I've bought this year, they seem to nail the expressions as well as the anatomy and conformation. The catalogue photo for this one wasn't very flattering, in person he's more matte-finish and doesn't look nearly as plasticky!


My Schleich mother-and-baby Poitou pair are Amélie and Émelie, so he really needed a French human name to match them, a fellow collector suggested Grégoire so that's what I've called him.

Sunday, 3 October 2021

The Devil's Cormorant

Time to introduce another non-equine repaint (don't worry, I'll be back to horses in my next post!), one of my favourite birds - the cormorant.

The Papo cormorant had already caught my eye earlier this year, but the moulded lettering along the front of the wings was a bit of a deal-breaker on an original finish model - just too obvious, too obtrusive.
After I'd painted my fox, I was wondering what other animal I was most inspired by, which would be another meaningful choice to carry on this new direction of wildlife repaints. And then I realised - if I was going to be customising anyway, I could get the coveted cormorant to repaint and deal with the ugly lettering at the same time!

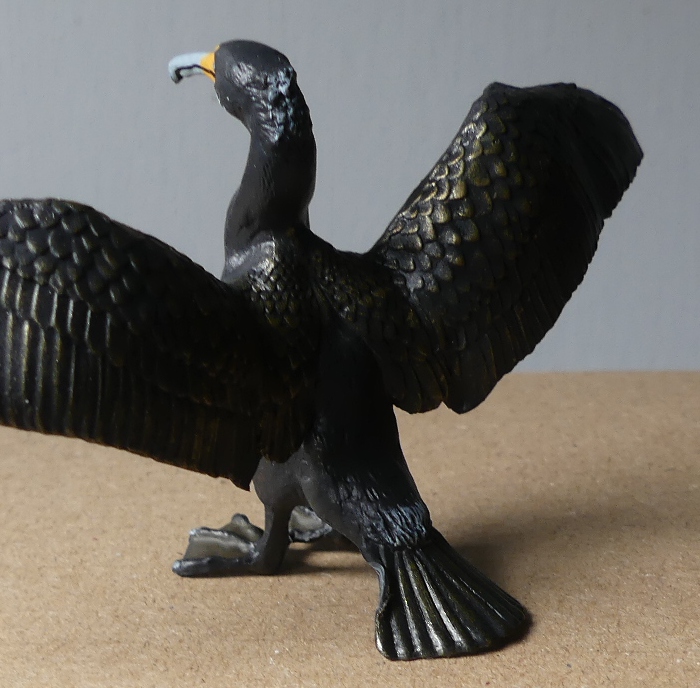
Here he is, straight from the packaging...


I really like how they've given him a metallic sheen, by rubbing gold over the sculpted feather texture. As with the fox, it's not that he's got a bad paintjob to start with, just that I really wanted to play with painting and see what I could do to make him look even better.

Unfortunately, his tail had been pushed out of shape by the plastic protective support he came in. But I held his tail in a glass of boiling water, intending to try pushing the bent bit back to shape, and as soon as it got hot enough for the plastic to soften, it popped back to exactly the right position, without me even touching it. So if you collect bird figures and happen to get a dented cormorant, dunk him!

You can see another slight issue he had on arrival - he tips back onto his tail, with his toes in the air. The centre of gravity was just off, meaning he couldn't balance upright on a flat level surface. This was also fixed with the hot water trick : hold his legs under the surface a few seconds to soften the plastic, then take him out and stand him on the counter, supporting him by the wings while the legs cool down and the plastic goes solid in the corrected position.

At first I tried carving the lettering off, but because the Papo plastic doesn't sand down very well, I couldn't get a smooth enough finish, so in the end he had to have some patched feathers!


There's his two little patches of resculpted wing (I rubbed them down to smooth off the rough edges once the Milliput was dry).

Once it was time to get painting, I chose two reference photos...


This one I took myself, for the white marking to match a cormorant I've actually met and photographed, rather than something more interesting but copied from a total stranger! They have different white patches in their breeding plumage than the rest of the year, and it does vary quite a bit from bird to bird.

And because my photo didn't show the wing feather colouring particularly well, I found this really bright and clear professional shot on google as my main painting reference.

So here he is - my first ever bird repaint!


I tried to get as much colour in to his wing feathers as possible, the reference photo linked really shows how much the tone varies, even though they just look like a black bird at a distance, up close there's a lot of deep brown, and pale highlights. The only part I didn't repaint was his eyes - my blue paint had set solid so I just went carefully round his old eyes, and gave each a speck of clear nail varnish afterwards to make them shiny.


He balances very nicely on this little resin tree trunk! I used a light application of metallic gold acrylic paint to give him some of the same sheen seen in his original paintwork, just a tiny dot of paint rubbed between my fingers then gently over the surface so it caught the tiny tiny sparkles without covering or changing his base colour. There's a little bit of dark green bloom on him, too, but just painted in with diluted viridian over his black, cos I didn't have any metallic green paint!

And here he is posing for an all-round photoshoot, with a nature book opened at a relevant page to provide a fitting background - all my horsey ones are fields with fences or walls, or grassy landscapes, so I needed something totally new for a water bird!


I love my little cormorant! The title of this post, by the way, comes from the excellent book about these fascinating birds, The Devil's Cormorant - A Natural History, by Richard J King. I couldn't find a copy in the UK, so had to have one sent over from a library clearance in the US!

Friday, 10 September 2021

A Harecroft Fox

The red fox has been one of my favourite animals since childhood, rare sightings of a quick bright animal dashing away, and starring in some of my favourite wild-animal-themed books, including Colin Dann's Farthing Wood series. In that pre-internet era of library books and buying wildlife magazines when they had the right animal on the cover, I read everything I could find about foxes!

Later, when I had my first job, I got to meet and make almost-friends with the foxes which called the same farm home. The adults got used to me, and would calmly glance up and wander off rather than running, and later in each summer, bring their babies into the paddocks to play in broad daylight, while I worked on weeding, or watched them alongside the horses. And when I stayed there overnight to mind the place while the owner was away, I'd wait up in the evenings (in the conservatory with the lights off) to watch the foxes hunting and interacting, all round the yard and fields I could see from where I sat.

A couple of weeks ago, I watched a really good red fox documentary on tv, and that was the final push which inspired me to buy a model to paint. After a couple of quick Ebay orders - one for the fox himself, one for some paints in appropriately gingery colours - I was ready to have a go!


Here's my little fox beforehand. He's not got a bad paintjob at all, with a nicely chosen shade of reddish brown, given some texture with the thin paint over the plastic so it settles into the detail of the sculpt, and his markings are pretty good, with white and black in the right places. This isn't one of those 'It was so terrible I HAD to repaint it!' moments at all, and if I was going to start collecting original finish animals, I'd have been perfectly happy to keep this fox as he was. But this is a project to make myself a custom fox, so he had to be transformed...


And here he is! I'm very pleased with how he turned out, considering this was a bit of an experimental venture into a whole new order of mammals!


I tried to give his coat as much variety in shading as I could, without going too exaggerated as I wanted him to be an 'average' kind of fox colour, a typical mid-reddish shade, rather than the very grey-backed, or very black-tinged, individuals. This was the reference photo I used, for the front half shading especially, and applying white in the right places, but deliberately didn't include so much of the blond/black on his back half, just to keep him more like the foxes I used to see.


This was my first time painting with some of these colours, usually I work my bright chestnutty horse colours from a very minimalist selection of one orangey brown, one burgundy, and one sandy tan, but to bring out the redder and more gingery fox colours, I had to buy a deep orange, a bright golden brown, and a paler reddish brown, too. The three extra paints cost more than the Papo fox did!


His other side - I find that, just as with my equine models, the fox has a 'good side' for photos and display, so this other side feels very much like the back of him - I think it's the position of his legs which does it.


I love his long, low running pose - you can just imagine him making his way along the edge of a field keeping by the hedge, or using a grass track between standing crops. 
This Papo sculpt reminds me most of the foxes I see here in the UK; a lot of model brands seem to be based on photos of American or far-northern-European foxes, very thick-winter-coat fluffy and looking short and stocky in the leg and neck, where our locals have a shorter coat, a longer leaner more athletic look.


Not a great picture but here's a view of the white markings underneath, and how they wrap round the limbs - a lot more complicated than just the white neck and chest his original paintjob had. The white underside, and the black leg/ear colour, do vary hugely from fox to fox, with some having entirely red legs with no dark points, and others somewhere in between. They can also have a dark or white tail tip. I copied the markings on mine from that good clear reference picture, apart from the tail tip, which I made whiter because I really do remember seeing that feature clearly on the foxes I used to watch at work.


With my model horse customs, the last part of creating them is usually to think of a name, so it makes a refreshing change to do a wild animal, who doesn't need one!